This post is in continuation of Oracle 10g Application Server administration (OCP) track 1Z0-312. This post covers second topic of certification track i.e. Cloning and Staging Oracle Application Server .
Cloning process mentioned here are w.r.t. Oracle Application Server 10g and not at all related to Oracle Applications 11i/R12 (Financials/HRMS)
This topic covers following points as per certification track explained under A, B, C…
A) Clone Oracle Application Server installations
=========================================
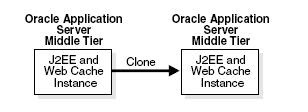
i) Cloning is process of creating replica of existing installation to differnt location while preserving its configurations.
ii) You can create a clone using command line cloning scripts or OEM 10g Grid control
iii)

You can clone J2EE and Web Cache middle tier which is not connected to Infrastructure,
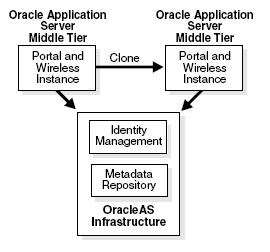
Similarly in Portal and Wireless only middle tier can be cloned (You can’t clone infrastructure tier) both source and target instances share same infrastructure database (as described in fig)
iv) During cloning source ORACLE_HOME is copied to destination ORACLE_HOME , then a set of scripts is used to update information in key configuration files of oracle application server middle tier (like hostname).
Key points in OAS cloning ?
—————————————
–You can clone middle tier installation of (J2EE & Webcache, Portal & Wireless and BI & Forms)
–You CANNOT clone
—–i)Infrastructure Tier (MR & IM)
—–ii)OAS Integration, BPEL Process Anaytics or BPEL process manager
—–iii) Developer kit and SDK
—–iv) Installation that includes workflow
–Cloned instance must have different name than source instance.
— You can clone MT (Middle Tier) that is member of OracleAS Cluster or Farm but you must remove instance from OracleAS Cluster and Farm before beginning cloning operation.
— Cloning process does not configure Load Balancer Router, If you use one, you have to configure it manually including invalidation port
— If in source webcache instance is member of cache cluster, then target webcahe should be manually added in to cache cluster (or delete other cache cluster member info manually if you don’t wish to target cloned instance as cache cluster)
— If source webcache instance is configured to forward requests to more than one origin server on same host as source web cache instance, then cloning will fail.
Cloning Process in Oracle Application Server
———————————————————-
i) On source instance run prepare_colne.pl (in $OH/clone/bin) (parses files, create archives using DCM, backs up required files, and run wireless clone assistant if wireless is enabled)
ii) Copy ORACLE_HOME to destination location
iii) ON target instance run clone.pl (invokes OUI which repeats all actions done during source instance installation time)
iv) post clone phase , clone.pl also does following post clone steps to make target cloned instance to a working state. These are
—-a) setting new ORACLE_HOME in DCM
—-b) update configuration file
—-c) calls chgiphost command to change hostname and IP address in cloned instance
—-d) If source instance was connected to OID (Portal/BI) then add information about clone in OID
—-e) After cloning start services on target instance on unix you have to run root.sh after cloning (from root)
B) Customize the cloning process
=============================
You can customize various aspects of cloning like specify custom port during cloning or preserve custom settings
i) Customizing ports during cloning
As mentioned above, cloning oracle application server in turn calls Oracle Universal Installer (OUI), Though you don’t see OUI calls; still OUI calls can be customized by configuration file cs.properties in $ORACLE_HOME/clone/ias/config
For example – To configure custom ports (to target instance) during cloning
clone_command_line = oracle.iappserver.iapptop:szl_PortListSelect=”{\”YES\”,
\”/location_of_port_list/portlist.ini\”}”
When you update this line in cs.properties while cloning , OUI will pick staticportlist.ini file and assign ports based on above file to target instance.
ii) Updating custom data
You can update custom data (custom files) that is not updated by default during cloning.
You can change/customize following data in target cloned instance
—Change hostname in a file -> Add full path name of file in which hostname needs to be cahnged to
$ORACLE_HOME/chgip/config/hostname.lst
—Update occurance of ORACLE_HOME in a file from old value to new OH value -> Use replace tag in fixup_script.xml.tmpl under
$ORACLE_HOME/clone/ias/config
—Extract value from file1 and use it to replace value in file2 -> Use alter tag in fixup_script.xml.tmpl under
$ORACLE_HOME/clone/ias/config
C) Use cloning to expand an OracleAS Cluster
==================================
The most common example of cloning Oracle Application Server is expanding a Oracle AS cluster. For example you have a cluster of J2EE and Webcache Middle tier with identical configuration and wish to add another J2EE and webcache node with identical configuration and deployemt. Assume source Oracle Application Server is connected to file based repository and member of farm and OracleAS Cluster following are cloning steps to expand this OracleAS Cluster
i) Remove Source isnatnce from Farm and Cluster (Use dcmctl or iasConsole); dcmctl leaveFarm and dcmctl leaveCluster
ii) Run preclone on source Instance (“perl prepare_clone.pl”)
iii) Copy oracle_home and associated files from source to target instance
iv) Run clone on target instance “perl clone.pl”
v) Add source isntance to Farm & Cluster (“dcmctl joinFarm” & “dcmctl joinCluster”)
vi) Add target instance to Farm & Cluster using same command mentioned above
Few points related to using cloning to expand OracleAS Cluster
–Cloning Oracle AS Clusters, If source cloned instance is member of Cluster/Farm as mentioned in past remove it from cluster add it back to cluster after cloning.
–If source instance (clustered) is connected to file based repository in separate instance (it is not host of file based repository), cloned instance will be member of same farm as source instance
–If source instance (clustered) is connected to file based repository in same instance (it is host of file based repository), cloned instance will be host of new file based repository.
D) Move J2EE applications from a test middle tier to a new production environment.
==========================================
Their are various ways/options (depending on your requirement)
in which you can move J2EE application from Test to Production Instance
i) You already have J2EE and Webcache type test & production inastance–> Use “dcmctl redeployApplication” or iAS console “Deploy EAR File” method.
ii) You already have J2EE and Webcache (without IM) Test Instance but no prod instance –> Use middle tier clone method (mentioned in previous post) or Install J2EE and Webcache type middle tier on production and deploy J2EE application (using dcmctl or iASConsole)
iii) You already have J2EE and WebCache (with IM & MR) Test Instance but no prod instance –> Install Infrasturure tier on prod instance, install J2EE and Webcache type middle tier and deploy J2EE application by method mentioned above in point ii)
E) Move OracleAS Portal metadata from test to production
==========================================

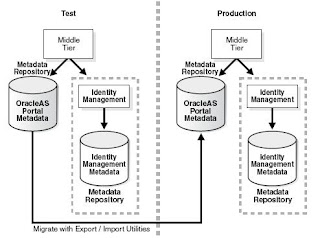
As figure shown here is self explanatory that we have an existing test & prod Oracle AS environment(Portal type) with Portal
Metadata repository on separate database. Now if you wish to move Portal MR from test to production use export/import feature
to move content from test to prod.
Please note here that export/import mentioned here is portal import/export and not database imp/exp (though portal import/export in background with some additional steps uses database exp/imp only)
i) Create transport set and extract content to transport tables (using portal exp/imp feature from GUI)
ii) Move transport set from source to target (using portal exp/imp command line tool)
iii) copy dump file and script file from source to target instance
iv) Run command line script to import data from dump file to transport tables on target instance
v) Import objects from transport tables to portal repository via GUI using Transport Set Manager Portlet
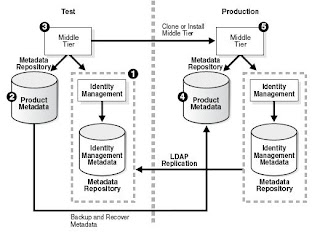
F) Move applications from a test middle tier with Identity Management and a product Metadata Repository to an existing production environment with Identity Management
========================================

As shown in figure, this migration from test to production assume that ; You have an existing production Instance which already had Middle tier, Identity Management and metadata repository.
Remaining steps on how to migrate them coming soon ….
If you have any doubts in above topic or any other topic, leave a comment and I’ll get back to you.

