Folks at this stage I feel that we should go with the example, and best way to learn the coding part of any language is Hello World program. So here I will discuss about the same.So be ready with the Jdeveloper and demo instance and create the program with me.
Step-1 Open the Jdeveloper tool and right click the Application to create New Application.

Step-2 Following screen will appear.Give the Application Name and directory Name. In my case I have created in the
Jdev/mywork directory.

Step-3 After clicking OK it will ask for the Project Name and its Directory name as shown. I am giving ‘Helloworld’ and click OK.

Step-4 Right the Hellworld Project in the Navigation Pane and then select New as shown below.

Step -5 After this you will get the screen as shown below and then here you need to go to Integration Server and select BPEL as we are creating it in BPEL and click OK.

Step-6 BPEL Creation Wizard will get open and will ask for Name ,Namespace and Template. Give the name Helloword, Namespace (default one) and Template as Synchronous BPEL Process and then click Next.

Step-7 After this you will get Input/Output Elements screen. Let it be the default value. Click the Finish Tab.

Step-8 After this you will get the screen with symbols receiveInput, replyOutput as shown.

Step-9 Now from the Component Palette we will drag and drop the Process Activities which are in the form of icon. Just selct the Assign Icon and drag it. It will show where this can be add. I am adding it in the centre.

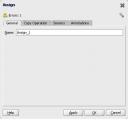
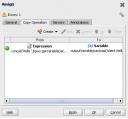
Step-10 Next is we need to write code for the Assign Process activity. Just double click the Assign icon and you will get the following screen. Give the name or let it be the default one only and then Click Copy Operation.
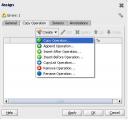
Step-11 After Clicking to Copy Operation as we are coping from expression. You will get such screen. Select the Copy Operation and then OK.
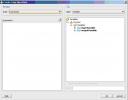
Step-12 Remember we are performing Concatenation operation that is copig from Expression. So we need to select Expression in From column.
Step-13 As everything in BPEL is represented in XML so we will write it in xml by clicking Xpath Expression Builder Tab

Step-14 As we need the Concat operation and it is available in String Function. So select that and then proceed further.
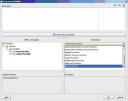
Step-15 Double click on concat function and you will get such screen
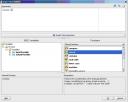
Step-16 After this you need write Hello in single quotes and then navigate the path of input variable as shown.
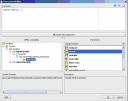
Step-17 After double clicking the variable you will get

Step-18 After clicking OK you will get the following screen. On the left hand side you will see the code. Click OK and proceed further.
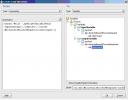
Step-19 After OK you will get. Which we can say is summary of code. Click OK.
Step-20 At this stage your coding part is done. Now you need to compile and deploy. As in my previous post I have given the method of deploying it so we can select any method to deploy. In the below shown method you are deploying it directly and no compilation is required explicitly.Just right click the Project name (Helloworld) and you will get Deploy option.Once you deploy it you will get Apache-Ant.log file which will tell you whetner it is deployed or not.

Step-21 Next is to deploy from BPEL Console directly. Here explicitly compilation is required using bplec. Login to http://host:port/BPELAdmin Follow the screens.

Click BPEL Domain

Click Default Domain and you will get finally this screen

Step-22 Click the Deploy New Process tab and then you need to provide the BPEL Suitcase file

Step-23 So first we need to create the BPEL Suitcase file manually which as shown in previous post can be done by using bpelc.bat utility.

Step-24 Provide the BPEL suitcase file in BPEL domain screen (Step-22)And click Deploy Button.

Finally you will get. Press Done

After this we need to Verify whether it works or not. Follow the steps below.
Step-25 On the BPEL Control Dashboard screen you will see.

Click to Helloworld. You will get

Give Input say ‘ORACLE BPEL’ and click ‘Post XML Message’ Button

You will get ‘Hello ORACLE BPEL’. Which is the desired output.

So we have seen how to create BPEL process and how to compile and deploy them. If you have any queries feel free to ask.

