After overview of Oracle Universal Content Management (UCM from Stellent) here, today’s post covers Installation of Oracle Content Server (Repository for UCM – Web Content Management, Document Management, Record Management ….). Content Server is key component of UCM which contains repository of UCM (solution from Stellent).
.
Assumptions with Content Server (repository for UCM) Installation
1. Database : We are using Oracle 10.2.0.1 as database for Content Server, other supported databases are MS-SQL, IBM DB2, Sybase…
2. Web Server : We are using Oracle HTTP Server (powered by Apache) as Web Server, other supported web servers are Sun One Server, IBM HTTP Server, stand alone Apache…
3. JDK : Content Server comes with its own JDK but installation gives you option to use existing JDK (Java Development Kit) on server.
.
Database Preparation
1. Install Oracle 10.2.0.1 database on Linux , check here or here
2. Create tablespace for content server data
SQL> create tablespace content_system datafile ‘/datafile_location/content_system01.dbf’ size 300M;
3. Create temporary tablespace for content server data
SQL> create temporary tablespace content_temp tempfile ‘/datafile_location/content_temp.dbf’ size 100M;
4. Create database user like db_admin
SQL> create user db_admin identified by db_admin temporary tablespace content_temp default tablespace content_system;
5. Create role like
SQL> CREATE ROLE stellent_role;
SQL> GRANT CREATE SESSION TO stellent_role;
SQL> GRANT CREATE TABLE TO stellent_role;
SQL> GRANT CREATE TYPE TO stellent_role;
SQL> GRANT CREATE PROCEDURE TO stellent_role;
SQL> GRANT CTXAPP TO stellent_role;
6.Grant role and unlimited tablespace to content db user
SQL> GRANT stellent_role to db_admin;
SQL> GRANT UNLIMITED TABLESPACE TO db_admin;
.
Web Server Preparation
Install Web Server, I installed Oracle HTTP Server (10.1.3.1.0) from Oracle Application Server 10g R3 CD (10.1.3..).
Oracle HTTP Server shipped with Oracle Application Server Media 10.1.3.1 is built on Apache 1.3.X version. Web Server for Content Server should be on Apache 2.X or higher.
Oracle Application Server 10.1.3.1 companion CD comes with HTTP Server 2.0.
.
Key Inputs during Content Server Installation
A. Native File Repository (vault) : is file repository where all checked-in files are stored in their native format (format in which they were created like word,gif..). Default location is directory vault inside Content Server base install directory.
B. Web Viewable file repository (weblayout) : is file repository where all checked-in files are stored in web-viewable format (e.g. PDF). Default location is directory weblayout inside Content Server base install directory.
C. Master Server or Proxied Server : In order to scale up (large client base) content Server deployment, you could install multiple content server; one as master and other ones as proxied server(s) each with their own Content Server Instances, Web Viewable file repository, Native File Repository, but share main communication interface and page delivery engine with master server.
D. Installation Log : Finally in case of any issues, Check Installation logs at $CONTENT_SERVER_BASE_INSTALL_DIR/ install/ log.txt
.
Oracle Content Server (repository & Core Services for UCM) Installation
1. Start Installation by running setup.sh from directory as per your operating system.
Provide Locale, Installation Type, Core Folder location.

2. Select JVM, Vault, Web Viewable file repository, Master Server, Admin Server as shown below
3. Select time zone, content server port, Admin port, security filter, URL Prefix as shown below
4. Select Web Server Address, Instance Name, Web Server Type and Database Server type
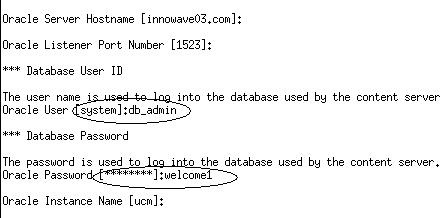
5. Select Database Server, DB Port, DB User, DB Password and Content Server additional components to install
6. If there are no issues you should see option 1 Proceed as highlighted, In my case it was option 2 Change Configuration (means some issue). “stellentrole.sql” missing, on careful inspection I realized I was using wrong database user (system), I should have used db_admin (created above)
7. Rerun configuration and fix issues
8. You should see “1. Proceed” , press enter for installation at this stage
9. Finally output should look like
.
References
How to access Content Server from browser, post install steps , issues during Web Server configuration or Installation of UCM’s Application Modules (Web Content Management, Document Management or Records Management) coming next ….


Comments are closed.