Oracle Identity & Access Management 11gR2 : Installation & Configuration in 12 Steps
This post covers steps to install and configure Oracle Identity & Access Management (IDAM) 11gR2 (11.1.2). To download IDAM 11gR2 (11.1.2) software click here and for documentation click here
Oracle Identity & Access Management 11gR2 (11.1.2) consists of
- Oracle Access Management (OAM) : OAM suite consists of
–> OAM Access Manager (earlier Oracle Access Manager)
–> OAM Secure Token Service
–> OAM Identity Federation (earlier Oracle Identity Federation)
–> Oracle Access Management Mobile and Social (new product added in 11gR2)
–> OAM Adaptive Access Manager
–> Oracle Entitlement Server
–> Oracle Web Services Manager (OWSM)
Note: There are few more products (Oracle Enterprise Gateway, Enterprise Single Sign-On etc…) that are part of Oracle Access management Suite but they are installed using their own software. - Oracle Identity Manager (OIM)
- Oracle Privileged Account Manager (OPAM) (new product added in 11gR2)
- Oracle Identity Navigator (OIN)
1. Install Database for Oracle Identity & Access Management(IDAM) schemas
2. Create IDAM schemas in database using RCU 11.1.2.0.0
3. Install JDK/JRockit 1.6 (for IBM Aix or HP Unix install vendor specific JDK).
4. Install WebLogic 10.3.6 (This step will create Middleware Home MW_HOME)
5. Install Identity & Access Management 11.1.2.0 software in Middleware Home (MW_HOME created in previous step)
6. Install SOA Suite 11.1.1.6.0 software in Middleware Home (MW_HOME created in step 4) (SOA is required only for OIM, If you are not configuring OIM then there is no need to install SOA Suite)
7. Apply patches listed in Release Notes here (Required for OIM only). [updated on 18th August 2012] If you can’t find patches listed in Release Notes of 11gR2 then check Bug 14489758 : WRONG PATCH NUMBERS IN RELEASE NOTES
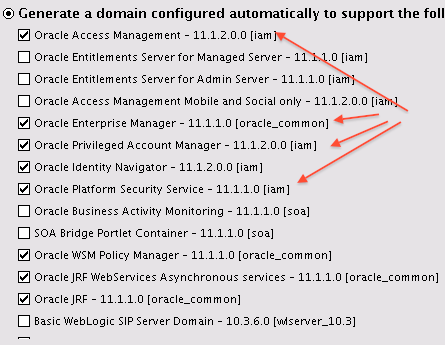
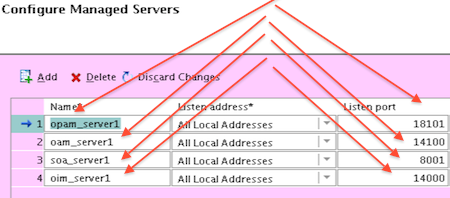
8. Create Weblogic Domain (more here) and select IDAM components by running config.sh from $MW_HOME/oracle_common/common/bin (Do not start WebLogic Server yet, create Database Security Store first as mentioned in next step)
9. Create Database Security Store using WLST – <IAM_ HOME>/common/tools/configureSecurityStore.py (Ignore this step if you are creating WebLogic domain with just one domain template i.e. “Oracle Access Management Mobile and Social“)
10. Start WebLogic Admin Server
11. Configure OIM Server ($IAM_ORACLE_HOME/bin/config.sh) – Ignore this step if you do not want OIM server
12. Start WebLogic Managed Servers created during WebLogic domain creation
References/Related
If you are looking for commonly asked Interview Questions for Oracle Identity Manager then just click below and get that in your inbox.


