This is third post in Series “Learn Oracle WebLogic with Us” .
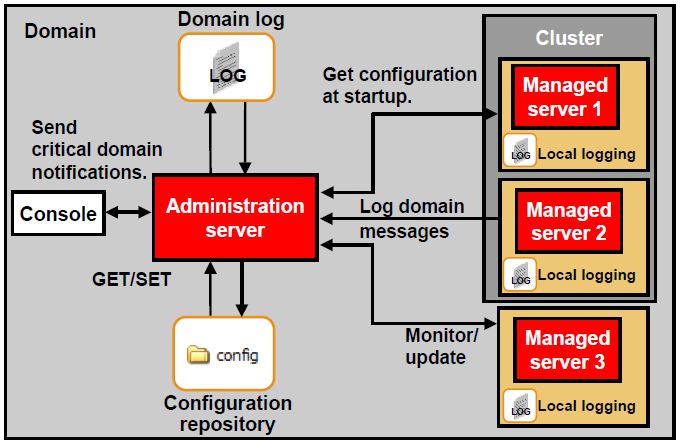
After WebLogic installation Here, next step is to create Domain. This post cover steps to create Domain in WebLogic (Simple – Administration Server or Advanced – one Administration Server and two Managed Server in a Cluster). If you are not familiar with Domain, Administration/Managed Server or Cluster then read my post here my post here or Oracle Documentation here
There are multiple ways to create domain, steps mentioned here are using Configuration Manager Wizard (config.sh or config.cmd).
–For Unix/Windows start configuration wizard using $BEA_HOME/ wlserver_10.0/ commom/ bin/ config.cmd (windows) or config.sh(UNix)
–To Start configuration wizard in console mode use – config.[cmd|sh] -mode=console
Screenshot below for creating Domain in WebLogic using Configurtaion Manager in GUI mode. Start Configuration Manager using command given above (config.sh / config.cmd)
1) Create or Extend Domain – In First screen you select if you wish to Create new WebLogic Domain or Extend an Existing WebLogic Domain.
Extending WebLogic Domainmeans you already have WebLogic Domain and want to add more Managed Server or configure cluster or configure additional applications.
2) Select Domain Source –
3) Configure Administrator – In below screen you define UserName and Password for WebLogic Domain and add/grant Administrator Role to that User (This user name /password will be used to start/stop domain if Mode of domain is Production and to login to domain Admin WebConsole)
4) Select JDK & Start Mode – In below screen, you define Mode in which you wish to start your domain and JDK (Sun, JRockit or any other JDK)
Production Mode– Domain is more secure, You need username password to start domain or deploy application.
Development Mode– Not very secure, You can Autodeploy application and no need to provide username/password to start Domain.
5) Customize your domain – Using below screen you can customize your domain (Create Managed Server, Cluster, JDBC Source, JMS File Store). Select initially No to create simple domain with Just one Administration Server (You can deploy your application in Administration Server but this is not recommended in Production Instance).
To create Advanced Domain (one Administration Server and two Managed Server and Cluster) go to Step 8 )
6) In next screen you provide Domain Name, Location of Domain.
7) Finally, If you are installing on Windows, you can select to “Start Admin Server“
Click Done to finish Domain Installation.
Next Step, go to Start WebLogic and access Domain Console from browser at end of this post.
.
Create Domain with one Administration Server and two Managed Server Instance in Cluster
Steps here are to create new Domain with one Administration Server (AdminServer), two Managed Server (MS1 & MS2) in cluster (cluster_1)
– Administration Server and both Managed Server are installed on single machine (you can configure them on multiple servers as well).
.
Administration Server
Name – AdminServer
Listen Address – All IP address on machine
Listen port – 7003
SSL Listen Port – 7004
.
Managed Server 1
Name – ms1
Listen Address – All IP address on machine
Listen port – 7103
SSL Listen Port – 7104
.Managed Server 2
Name – ms2
Listen Address – All IP address on machine
Listen port – 7203
SSL Listen Port – 7204.
Cluster Details
Cluster Name – cluster_1
Multicast Address – 239.192.0.0
Multicast Port – 8050
Cluster Address – 127.0.0.1
Cluster Member – ms1 & ms28 ) Start with step 1) to 4) as shown above on screen 5) “Customize Environment” select Yes as shown below
9) Configure Administration Server – configure Administration Server using this screen like Name, Listen & SSL Listen Port
10) Configure Managed Server – click on Add to add managed server.
11) Configure Managed Server – Add two managed server (ms1:7103:7104 & ms2:7203:7204)
12) Configure Cluster – click on Add to create cluster and add Managed Server in Cluster. If you have NOT defined any managed server in previous screen, you will NOT get this screen.
13) Configure Cluster– Define cluster with Cluster Name, Multicast Address, Port and address.
14) Assign Server to Cluster – Use this screen to add Managed Server on Left hand side to Cluster on right hand side.
15) Assign Server to Cluster – as shown in below screen shot, We added MS1 & MS2 to cluster_1
16) Configure Machine – Use this screen if you have more than one machine in your system. In our configuration Administration Server and all Managed Server are on single machine.
17) Review WebLogic Domain –
18) Create WebLogic Domain – define Domain Name and Domain Location on this screen. This screen is similar to step 6) above
.
.
Start WebLogic Domain
Once you have successfully created domain, next step is to start weblogic domain and access Administration Console. (Steps here are to start basic domain – only one Administration Server, “Start/Stop WebLogic Server – Administration and Managed Server” coming soon… )
Startup Script
$BEA_HOME/user_projects/domain/<domain_name>/bin/startWebLogic.sh (Unix)
$BEA_HOME\user_projects\domain\<domain_name>\bin\startWebLogic.cmd (Windows)
I installed domain with name base_domain and my BEA_HOME is c:\bea hence to start my domain –
c:\bea\user_projects\ domains\ base_domain\ bin\ startWebLogic.cmd
.
Access Administration Console
Default Administration Port is 7001 so use port as 7001 (else use port you entered while creating WebLogic Domain)
http://<servername>.domain:7001/console
or
http://localhost:7001/console (If you are accessing from server directly)
Login to WebLogic Admin Console using UserName/Password created during WebLogic Domain Creation.
After successful login you should get screen like below.
.
References
Oracle WebLogic Domain Configuration Guide
Learn Oracle Weblogic Server Administration
Get 100 USD OFF + 100% Money Back Guarantee


Comments are closed.