Configure Oracle Entitlement Server Client – Security Module 11gR2 (11.1.2) for OSB 11g with JRF : Part IV
This is part IV of Oracle Entitlement Server & Client (Security Module) 11gR2 installation and Configuration, In this post I am going to integrate Oracle Service Bus (OSB) 11g (11.1.1.6) with OES 11g R2 (11.1.2.1) using OES Client (Security Module) for OSB.
For Part I Install OES Server click here , For Part II Configure OES Server click here, and for Part III Install OES client software click here
Note: When you are installing OES client software in part III of this series, Install OES client software in same Middleware Home as OSB . OSB and OES client must be in separate Oracle Home but under same Middleware Home.
Things you must know before configuring OSB with OES
- OSB 11g is installed on WebLogic with JRF (Java Required Files) i.e. oracle_common directory.
- OES SM can talk to OES Server for policy distribution in one of three modes i.e. CONTROLLED-PUSH, CONTROLLED-PULL, UNCONTROLLED-PULL . More on these three policy distribution mode later.
- For OES SM with JRF only supported distribution mode is CONTROLLED-PULL or UNCONTROLLED-PULL . CONTROLLED-PUSH is NOT supported for OESSM with JRF
- OESSM for OSB comes with JRF and hence only supported policy distribution mode with OESSM for OSB is CONTROLLED-PULL or UNCONTROLLED-PULL
- In PULL MODE (CONTROLLED or UNCONTROLLED), Security Module talks direct to OES database (Policy Store) hence Database Port from OESSM to OES Database must be open.
- Supported OSB version for integration with OES 11gR2 (as of Oct 2013) is OSB version 11.1.1.6 only. OSB version 11.1.1.7 is not yet (as of Oct 2013) certified with OES 11gR2.
- OES does not secure resources used for OSB configuration like /sbconsole
- OSB Security Module Configuration is detailed at here and here
Pre-Requisites steps before integrating OSB with OES
Make sure following steps are configured before configuring OES Security Module for OSB with JRF
1. OES server software is installed & configured
2. OSB Server software is installed
3. OES SM is installed in same Middleware Home as OSB (OSB ORACLE_HOME and OES SM ORACLE_HOME are in different directory but under same Middleware Home)
4. OSB Domain configuration is optional (If OSB domain is NOT yet configured then you can configure OSB domain during OES integration). In this example OSB domain already exists.
5. As discussed in my previous post things you must know while configuring OES SM and mentioned earlier in this post you must decide on Security Policy distribution mode (Controlled Pull, or Non Controlled Pull) I am going to use Controlled-Pull
Note: Controlled-Push is NOT supported with WebLogic/OSB SM with JRF and hence I am using controlled-pull.
OSB integration with OES
1. Update smconfig.wls.controlled.prp on OSB node (In this step we are creating properties file that will be used later in this post to create an instance of Security Module for OSB on OSB host)
cd $OSB_MIDDLEWARE_HOME/oesclient/oessm/SMConfigTool (where oesclient directory is OES CLIENT ORACLE_HOME)
cp smconfig.wls.controlled.prp smconfig.wls.osb_controlled_pull.prp
Open file smconfig.wls.osb_controlled_pull.prp file and change
oracle.security.jps.runtime.pd.client.policyDistributionMode=controlled-pull
oracle.security.jps.runtime.pd.client.sm_name=OSBSM
oracle.security.jps.policystore.type=DB
jdbc.url=jdbc:oracle:thin:@[DBHOST]:[DBPORT]/[SERVICE_NAME]
jdbc.driver=oracle.jdbc.OracleDriver
datasource.jndi.name=jdbc/APMDBDS
security.principal=OES_OPSS
security.credential=Password1
bootstrap.security.principal.key=oes_sm_key
bootstrap.security.principal.map=oes_sm_map
oracle.security.jps.farm.name=cn=oes_domain
oracle.security.jps.ldap.root.name=cn=jpsroot
In controlled pull or uncontrolled pull you don’t define below two properties
oracle.security.jps.runtime.pd.client.RegistrationServerHost
oracle.security.jps.runtime.pd.client.RegistrationServerPort
Note:
a) Controlled-Pull here represents that Policies from OES Policy Store (Database) will be pulled by OES SM (Security Module) for OSB in controlled manner.
b) OSBSM is name of security module instance
c) DB means OES policies are stored in a database
d) [DBHOST]:[DBPORT]/[SERVICE_NAME] is database details of OES Policy Store Database
e) OES_OPSS is the name of OES Policy Store schema name in OES Database
f) welcome1 is password of OES_OPSS schema
g) cn=oes_domain is domain name of OES server (note that this name is WebLogic Domain name where OES is deployed)
h) cn=jpsroot is location of Policy Store of OES domain
2. Run configuration tool
$OES_CLIENT_HOME/oessm/bin/config.sh -onJRF -smType wls -prpFileName $OES_CLIENT_HOME/oessm/SMConfigTool/smconfig.wls.osb_controlled_pull.prp –serverLocation <LocationofWebLogicServerHomeOfOSB>
export JAVA_HOME=/oracle/apps/atul/mw/jdk6
cd /oracle/apps/atul/mw1035/oesclient/oessm/bin
./config.sh -onJRF –smConfigId SMFORWC3 -prpFileName /oracle/apps/atul/mw1035/oesclient/oessm/ SMConfigTool/ smconfig.wls.controlled_pull.prp –serverLocation /oracle/apps/atul/mw1035/wlserver_10.3
Note: Above command will do two things
a) Create Security Module instance directory under $OES_CLIENT_HOME/oes_sm_instances/[SMConfigID] i.e. $OES_CLIENT_HOME/oes_sm_instances/OSBSM
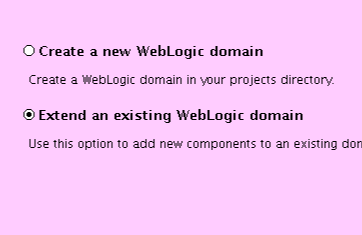
b) Starts installer to create/extend domain to include OESSM (as shown below)
Note: If there is no OSB WebLogic Domain then select “Create a New WebLogic Domain“, if OSB domain already exists then select “Extend an existing WebLogic Domain”
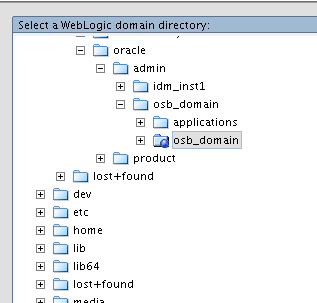
Note: Select the OSB domain (only if you are extending OSB domain to include OESSM). If you are creating new OSB Domain, then enter location of OSB Domain.
Note: Select Template “Oracle Entitlement Server Security Module on Service Bus” . If you are creating new WebLogic Domain then apart from “Oracle Entitlement Server Security Module on Service Bus” select OSB related templates.
In this example you can see that Oracle Service Bus is already selected and Greyed out.
Follow steps to complete domain extension .
3. Update jps-config.xml from OSB domain for “OES Security Module for OSB” by using OESSMCONFIG tool
cd $OESCLIENT_ORACLE_HOME/oes_sm_instances/[OESSM_NAME]/bin/ (where OESSM_NAME in my case is OSBSM )
./oessmconfig.sh -jpsconfig [OSB_DOMAIN]/config/fmwconfig/jps-config.xml (jps-config.xml must be from OSB DOMAIN/config/fmwconfig where you wish to configure OES Security Module )
Change
a) Policy Distribution Mode to “Controlled-Pull”
b) Policy Store to “Database Configuration through URL jdbc.url=jdbc:oracle:thin:@[DBHOST]:[DBPORT]/[SERVICE_NAME] is database details of OES Policy Store Database
OES_OPSS is the name of OES Policy Store schema name in OES Database
welcome1 is password of OES_OPSS schema
c) cn=oes_domain is domain name of OES server (note that this name is WebLogic Domain name where OES is deployed)
d) cn=jpsroot is location of Policy Store of OES domain
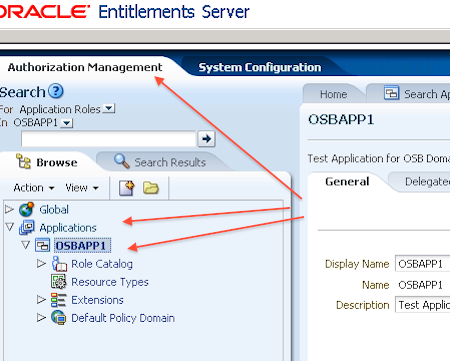
4. Create Application & Register Security Module in OES (http://OESHost:adminPort/apm )
4.1 Create Application in OES
APM : Authorization Management -> Applications -> New
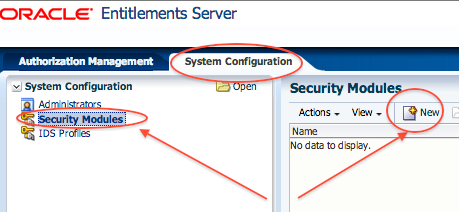
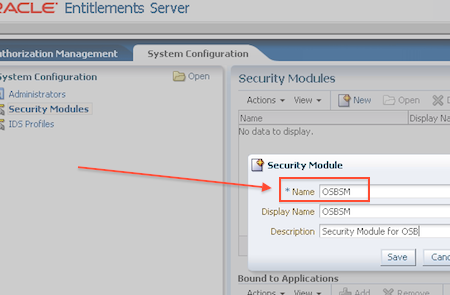
4.2 Create Security Module in OES
APM : System Configuration -> Security Modules -> New
Enter Display Name
Name
Description
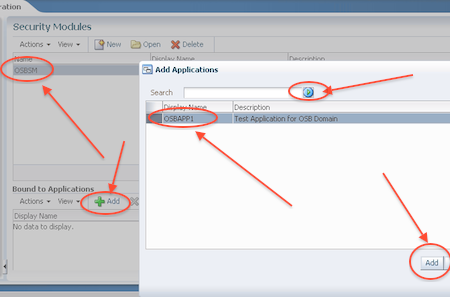
4.3 Bind Security Module to Application in OES
APM : System Configuration -> Security Modules -> OSBSM -> Add
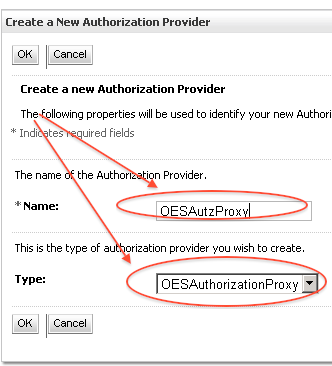
5. In OSB Domain, OES Proxy Provider must be enabled to secure and protect OSB runtime so next step is to configure OES Proxy Authorization Provider
OSB WebLogic Domain : Security Realm -> myrealm -> Providers -> Authorization -> New
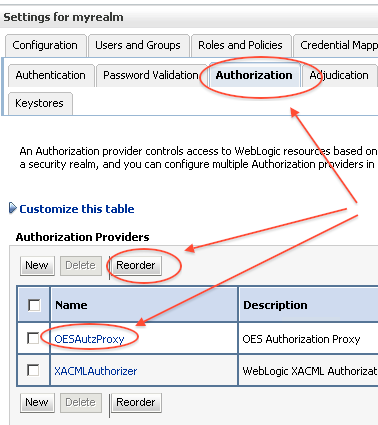
5.1 Re-order the Authorization Provider so that OES Authorization Proxy is first provider
5.2 Restart WebLogic Admin & Managed Server of OSB
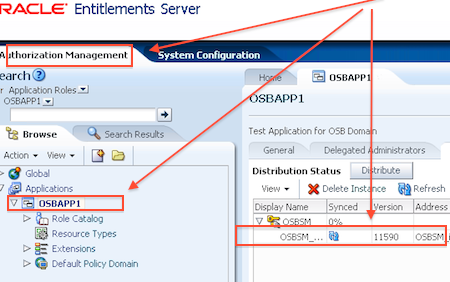
6. Distribute Application Policy to Security Module (SM) for OSB
More on Policy Modelling for OSB Resources in OES Server in upcoming posts
About the Author Atul Kumar
Oracle ACE, Author, Speaker and Founder of K21 Technologies & K21 Academy : Specialising in Design, Implement, and Trainings.

