
This post covers installation of Oracle Enterprise Manager (OEM) Cloud Control 12c . For overview of OEM 12c installation click here
- Basic Installation Guide for OEM 12c is available here
- Advanced Installation Guide is available here
1. Install database that will contain OEM repository.
2. Start Installer by running $OEM12C_SOFTWARE/runInstaller (setup.exe for Windows)
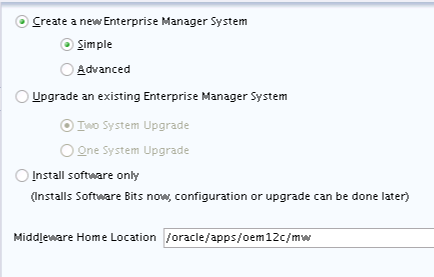
3. Select Install Types (You can select Simple or Advanced, for this post I am suing Simple install type) and provide Middleware Home (This must be blank directory in which installer will install weblogic, jdk, OEM Binary for OMS & Agent )
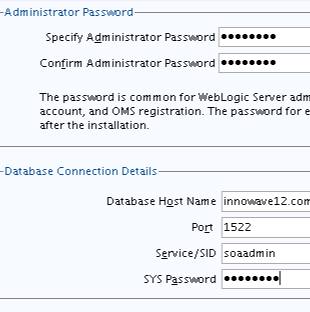
4. Provide Administrator Password and Database connection details (administrator password is used with weblogic user to log on to OEM Cloud Control Console and Weblogic Console)
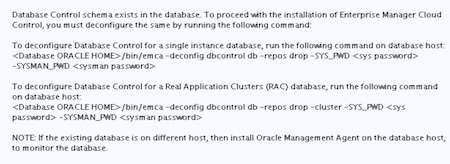
5. If Database contains dbcontrol then, installer will prompt you to de-register it. Deregister database control using emca -deconfig (run this command on database node) as shown below from database
6. If prerequisite check fails then installer will warn you but you can skip checks and fix them later (It is recommended to fix failed pre-requisite checks)

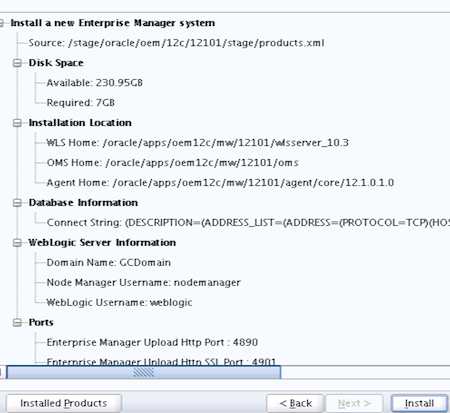
7. Click on Install button on Review screen
.
Note: Installer will install three homes as shown above WLS_HOME, OMS_HOME, and AGENT_HOME
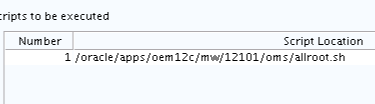
8. After configuration when prompted run allroot.sh from root user (Only on Unix)
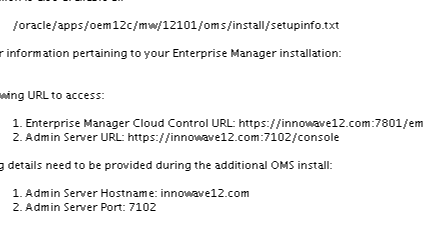
9. After installation note down URLs listed on Installer screen
10. Directory structure after installation should look like
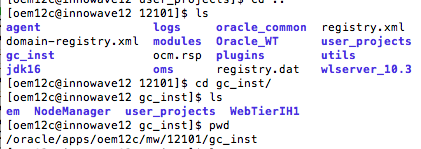
a) Directory agent is AGENT_HOME
b) Directory gc_inst is ORACLE_INSTANCE that contains OHS instance (gc_inst/WebTierIH1) and Weblogic Domain (gc_inst/user_projects)
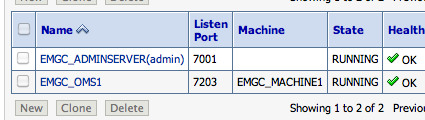
11. WebLogic Server will create Domain with 1 Admin Server and 1 Managed Server as shown below
WebLogic Admin Server (EMGC_ADMINSERVER) & Managed Server (EMGC_OMS1) – To know more about WebLogic Domain, Admin Server and Managed Server click here
12. Access OEM 12c Cloud Control Console using https://hostname:OHS_SSL_PORT/em (Default Protocol is HTTPS and port is WebTier/OHS SSL Listen Port)
13. In Nutshell OEM 12c will creates
a) OMS – Oracle Management Service controlled by emctl . OMS consists of Java Component (WebLogic with 1 Admin Server and 1 Managed Server) and System Component (Oracle HTTP Server managed by OPMN)
b) OMA – Oracle Management Agent controlled by emctl
More on start-up/Shutdown and troubleshooting OEM 12c cloud control later